¶ Overview
Configuring a VIDEO_STREAM sensor can be done when adding a new device or editing an existing one. Follow the detailed steps below for each scenario.
¶ How to Add Sensors
You can configure sensor following way
-
Adding a New Device
-
Editing an Existing Device
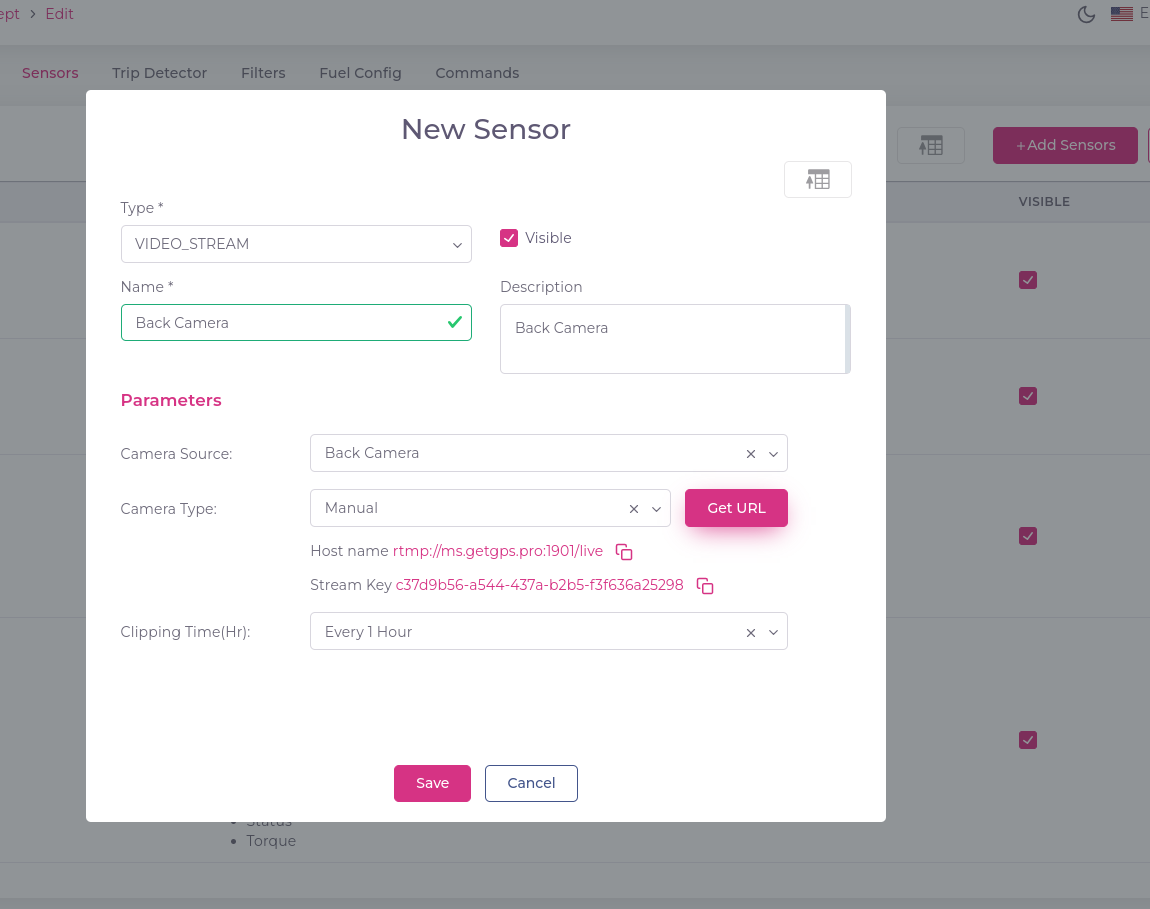
To add and configure a VIDEO_STREAM sensor:
-
Click on Add Sensor
On the sensor configuration page, click the Add Sensor button. -
Choose Sensor Type
In the Sensor Type dropdown, select VIDEO_STREAM from the list. -
Enter Sensor Name and Description
Provide a descriptive name in the Name field. Optionally, add a description to help identify the sensor. -
Set Visibility
Check the Visibility checkbox if you want this sensor to appear in the UI. -
Configure VIDEO_STREAM Parameters
Set the following for the VIDEO_STREAM sensor:- Camera Source: Choose between Back Camera or Front Camera.
- Camera Type: Two options:
- Manual: Click the Get URL button to generate a Host Name and Stream Key.
- Auto: Automatically manage the stream without manual URL generation.
- Clipping Time: Select clip storage frequency:
- Every 1 Hour
- Every 2 Hours
- Every 3 Hours
-
Save or Proceed to Next Step
Click Save or Next to complete the configuration. The sensor setup is now complete. -
Viewing the Video Stream
Once configured, the video stream will be available on the device's unit screen. Click the provided link to view the stream.

¶ How to use it
You can refre following link to how use it in units click here
¶ Troubleshooting
¶ Common Issues and Solutions
-
Video Stream Not Visible on Device Screen
- Cause: Incorrect configuration of the camera source or camera type.
- Solution: Ensure that the correct Camera Source (Back or Front) is selected. Double-check the Camera Type setting (Manual vs. Auto) and confirm the stream URL is correctly generated in Manual mode.
-
Clipping Time Not Working as Expected
- Cause: Incorrect clipping time setup.
- Solution: Revisit the Clipping Time settings and ensure the desired interval is selected.
-
Stream Key Not Generated
- Cause: Network connectivity issues or incorrect manual configuration.
- Solution: Ensure stable network connectivity and try clicking the Get URL button again. Verify the device’s network settings if issues persist.
-
Video Stream Lagging or Buffering
- Cause: Bandwidth limitations or high-resolution streaming.
- Solution: Reduce the streaming resolution or improve the network bandwidth.
-
Visibility Settings Not Applied
- Cause: The Visibility checkbox was not selected.
- Solution: Go back to the sensor configuration page and ensure the Visibility option is checked.
By following the steps and troubleshooting tips in this guide, you can efficiently configure and resolve issues with the VIDEO_STREAM sensor for both new and existing devices.