The sensor dialog defines one sensor of a device: its type, its name, its settings and the telemetry parameters it reads. To open it, go to the device's Sensors tab and select Add sensor, or select Edit on a sensor's row. See Sensors tab.
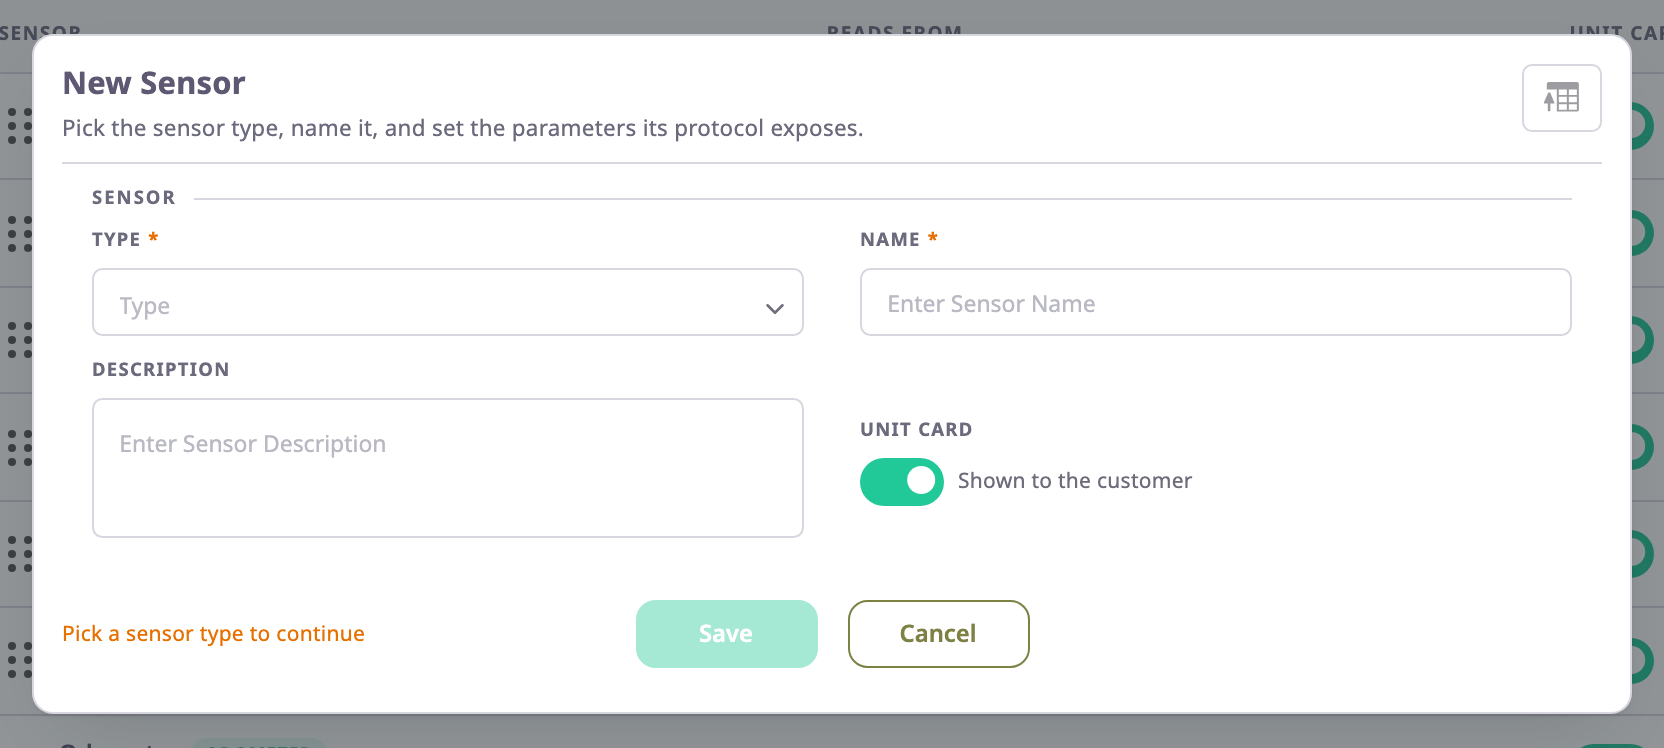
¶ The dialog
The title says what you are doing:
| Title | Opened by |
|---|---|
| New Sensor | Add sensor, or Clone on a row |
| Update Sensor | Edit on a row |
| View Sensor | View on a row, when the device is view-only. You cannot change any field, and the dialog has no Save. |
The dialog has up to three groups. Sensor holds the fields every sensor has, and Settings the values you type once. Telemetry mapping holds the values the app computes from each message. Which settings and telemetry fields appear depends on the type. See Sensor types.
In New Sensor, the Upload Sensor button in the dialog's header fills the dialog from a sensors JSON file. It takes the first sensor in the file and saves nothing until you select Save.
¶ Sensor fields
| Field | Required | What it does | Allowed values / example | Notes |
|---|---|---|---|---|
| Type | Yes | Decides which settings and telemetry fields the sensor has and how the rest of the app uses it. | One type from the list, shown by its type code. Example: FUEL | Some types allow only one sensor per device; saving a second one fails with a message such as "Not allowed multiple IGNITION sensors". Changing the type of a saved sensor asks for confirmation first. |
| Name | Yes | Names the sensor on the unit card, in reports and alerts, and in other sensors' expressions. | Any text, unique on the device. Example: Fuel tank | Case does not matter for uniqueness: a duplicate fails with "Sensor Name Already Exists". Other sensors refer to it as [Fuel tank#level], so renaming it breaks those references. |
| Description | No | Shows under the sensor's name on the Sensors tab. | Any text. Example: Rear tank, 300 l | — |
| Unit card | No | Shown to the customer puts the sensor on the unit card the customer sees. | On or off | On for a new sensor. The same setting as the Unit card switch on the Sensors tab. |
¶ Settings group
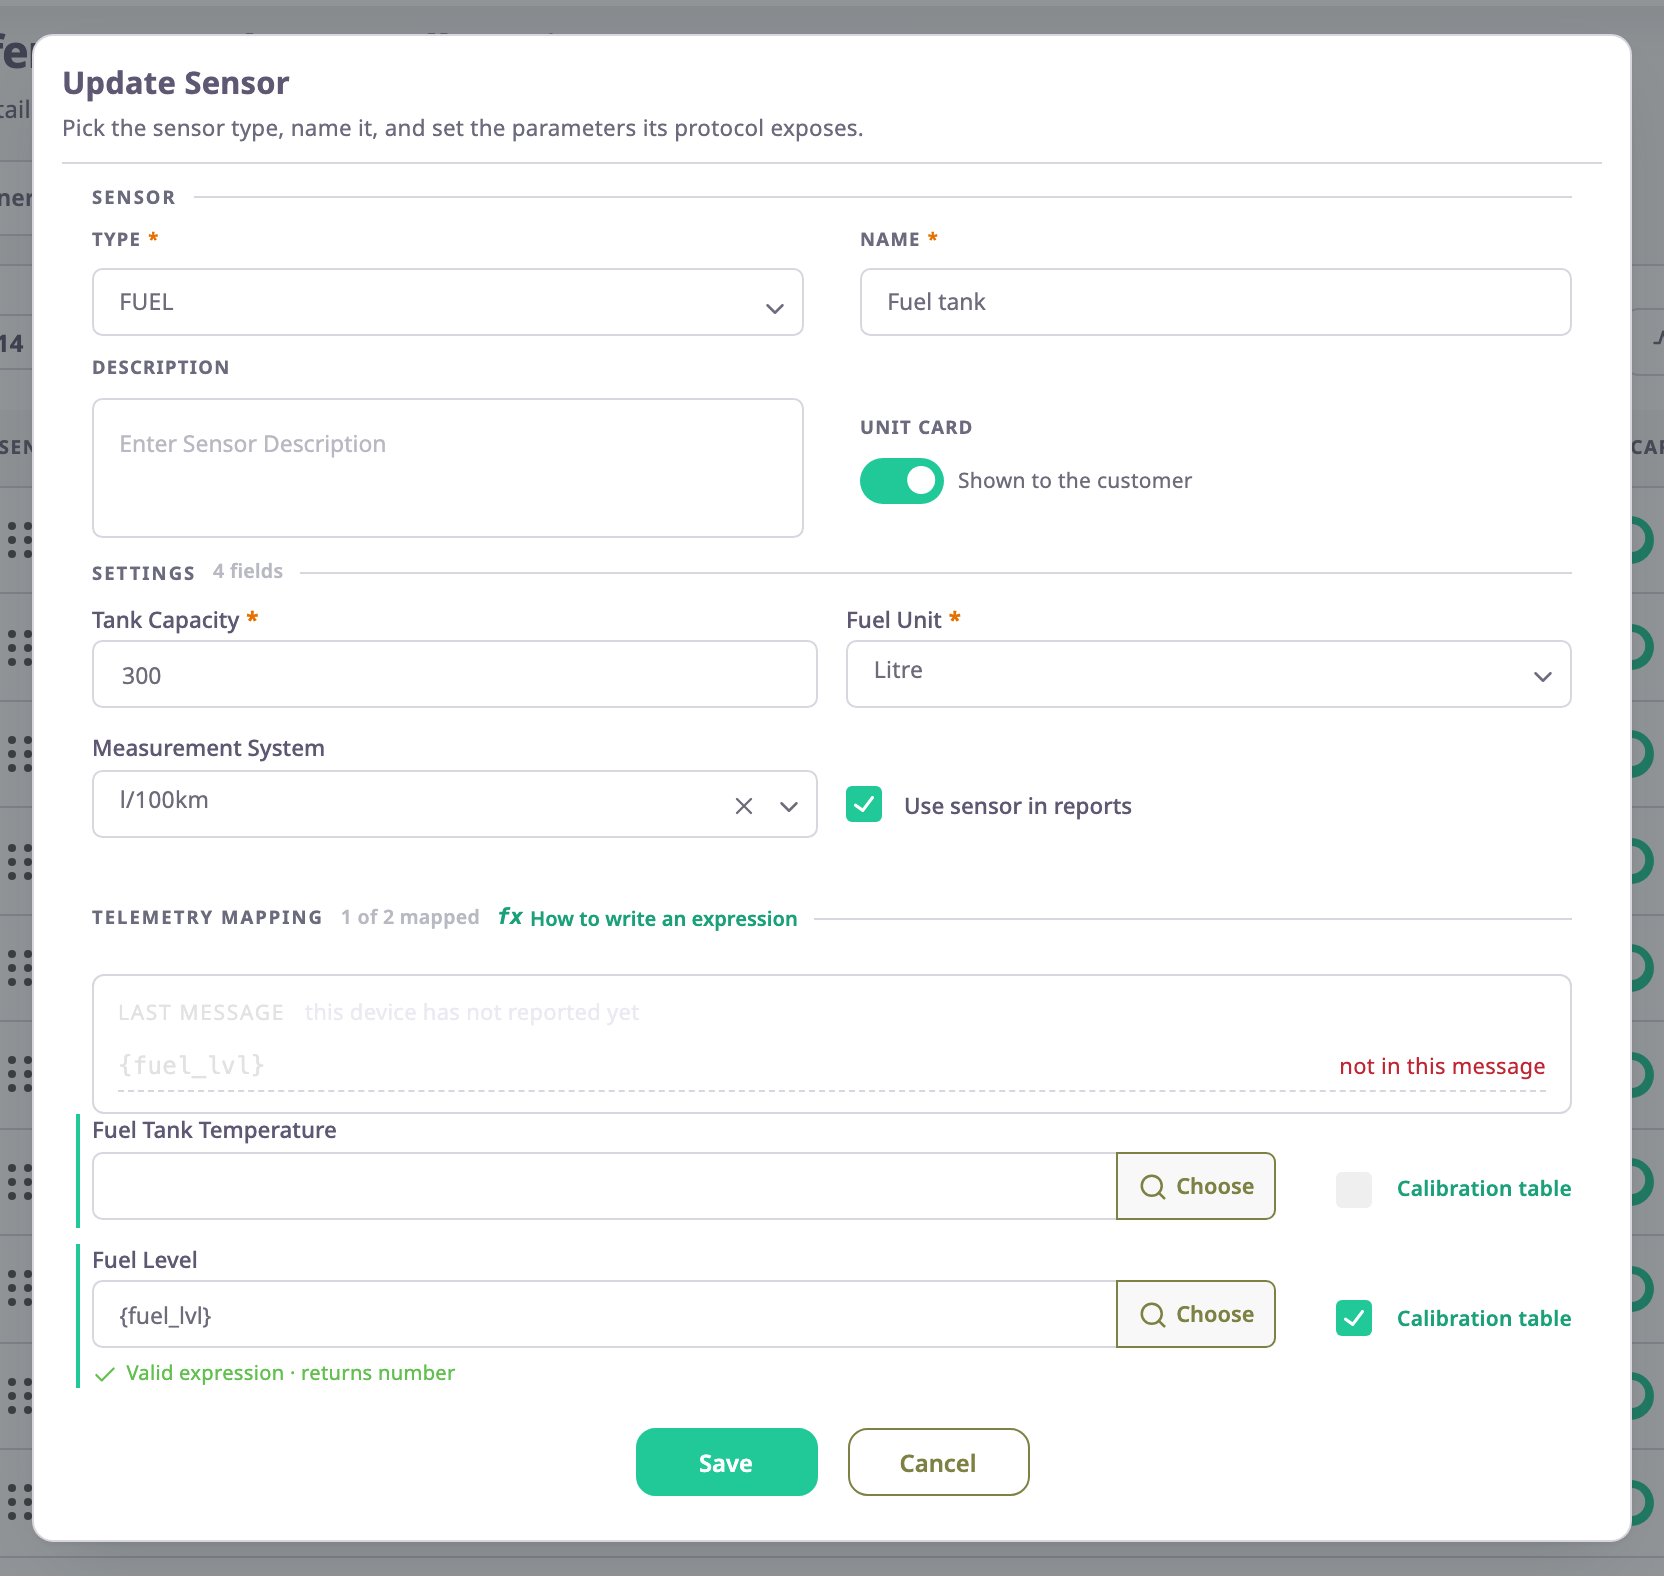
Settings holds the type's values that you type or pick once. Examples are a unit of measure, a tank capacity or the text to show for "on" and "off". The heading counts them, for example "4 fields". Required settings carry an asterisk. A type with no settings has no Settings group.
¶ Telemetry mapping group
Telemetry mapping holds one row per value the sensor computes from each message. The heading counts how many rows have an expression, for example "1 of 2 mapped". Required rows carry an asterisk.
Each row has:
- The expression field. Enter the parameter in braces, such as
{fuel_lvl}, or an expression, such as{ext_volt} / 1000. Typing{lists the device's parameters of the right kind, and typing[lists the other sensors' fields. Use the arrow keys to move, Enter to insert at the cursor and Esc to close the list. The full syntax is in the Expression reference. - The check line under the field. It says "Valid expression · returns number" when the expression works, and adds the result for the last message when the device has one. Otherwise it names the problem, for example an unclosed bracket or a parameter the protocol does not have.
- Choose opens Choose a parameter, described below.
- The fx marker shows when the field's expression tests a condition ("This field uses a condition").
- The calibration tick and Calibration table. The tick is on when the field has a calibration table; you cannot change it here. Calibration table opens the dialog where you build the table and the field's condition. See the Calibration table dialog and the Conditional tab. Only fields that hold numbers have these.
How to write an expression, on the group's heading, opens a short guide with the operators and examples; Hide closes it. A "Last message" panel above the rows lists each parameter the expressions name. It shows the parameter's value in the device's last message and when that message arrived. For a device that is not on a unit, it says "this device has not reported yet".
¶ Choose a parameter
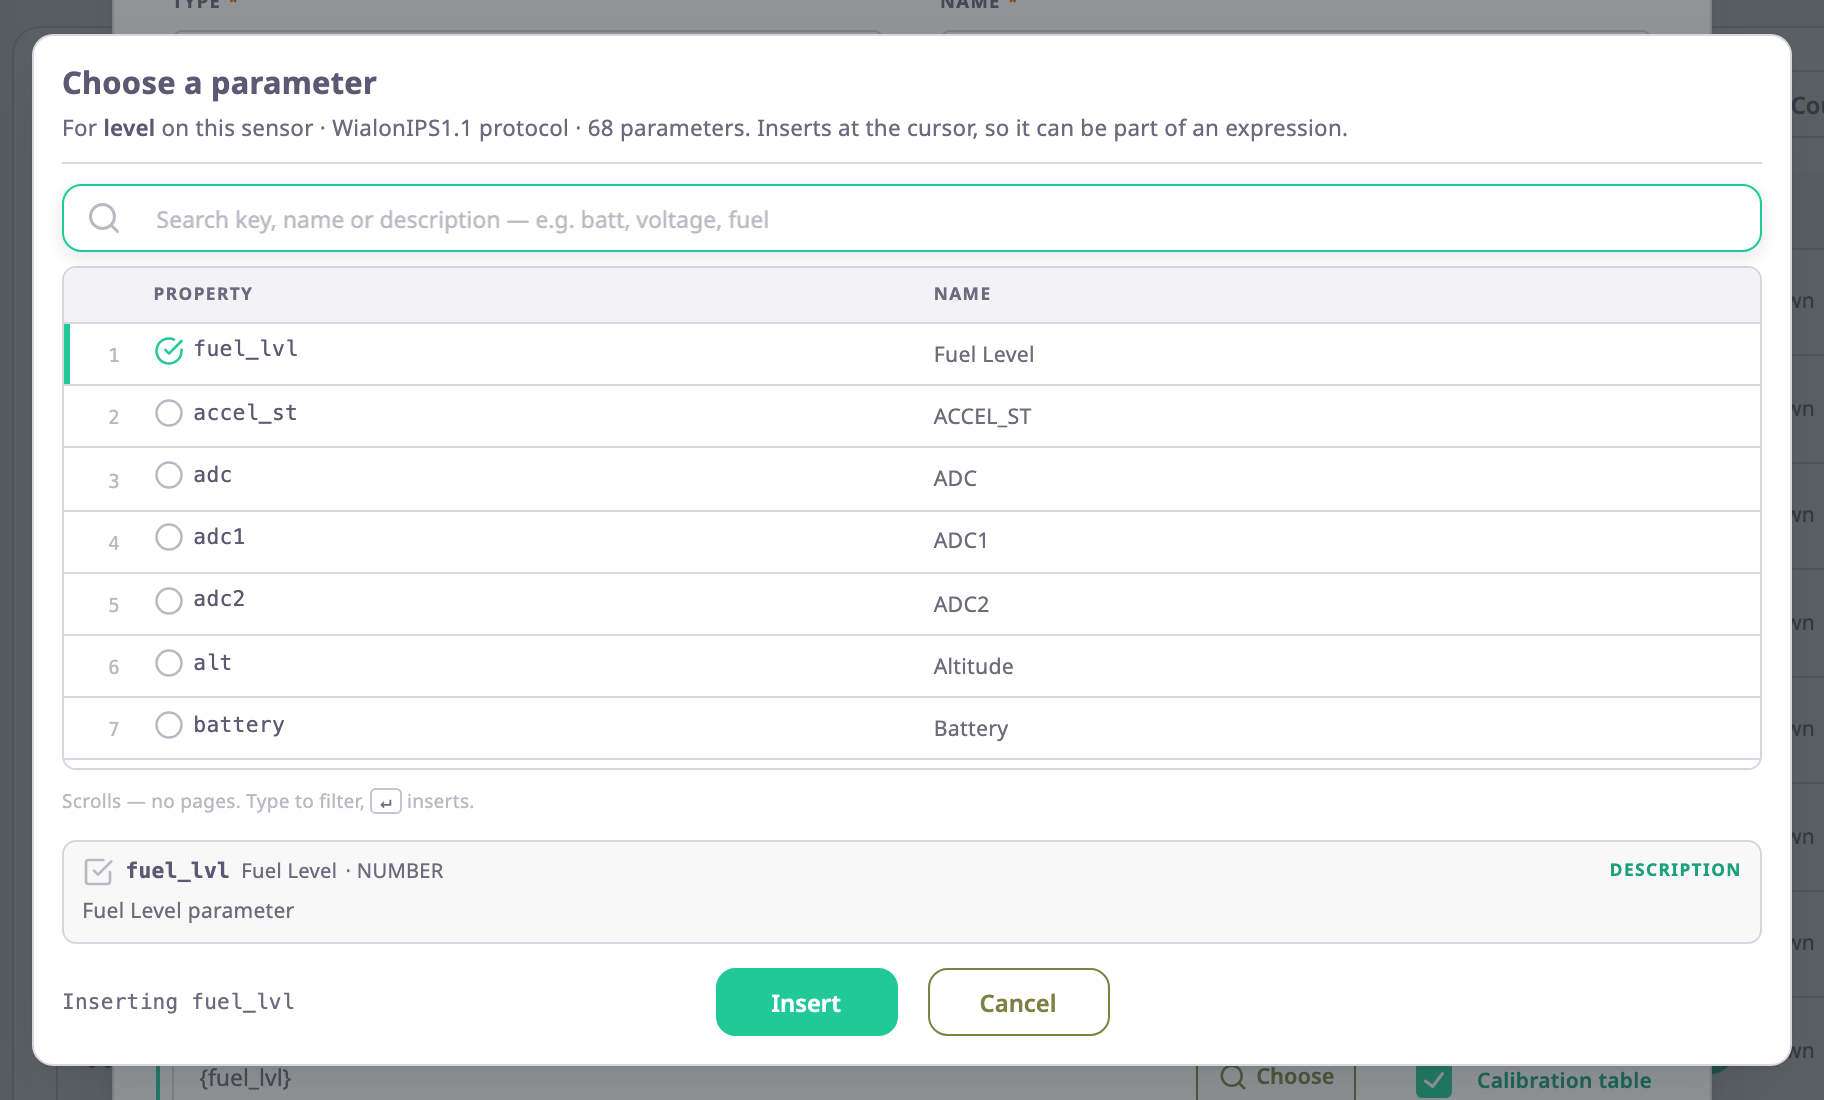
Choose a parameter lists every parameter of the device's protocol. The line under the title names the field you are mapping, the protocol and the number of parameters.
| Control | What it does |
|---|---|
| Search | Narrows the list to parameters whose key, name, type or description contains the text, for example volt. |
| "Suggested for FUEL" and All | Switch between the parameters that suit the field and the full list. The suggested filter shows only when the protocol has suggestions for the field. |
| A row | Selects the parameter and shows its key, name, type, range and description under the list. Selecting a row changes nothing yet. |
| Insert | Writes the selected parameter in braces into the field, for example {fuel_lvl}, and closes the picker. Enter in the search box does the same. |
| Cancel | Closes the picker and leaves the field as it was. |
Insert replaces the whole field, although the line under the title says "Inserts at the cursor, so it can be part of an expression." To build an expression, insert the first parameter, then type the rest in the field. On an optional field, inserting the parameter that is already mapped clears the field.
If the device's model has no protocol, the picker shows a red error instead of the list. It asks you to contact support about the device model's configuration.
¶ Custom sensor fields
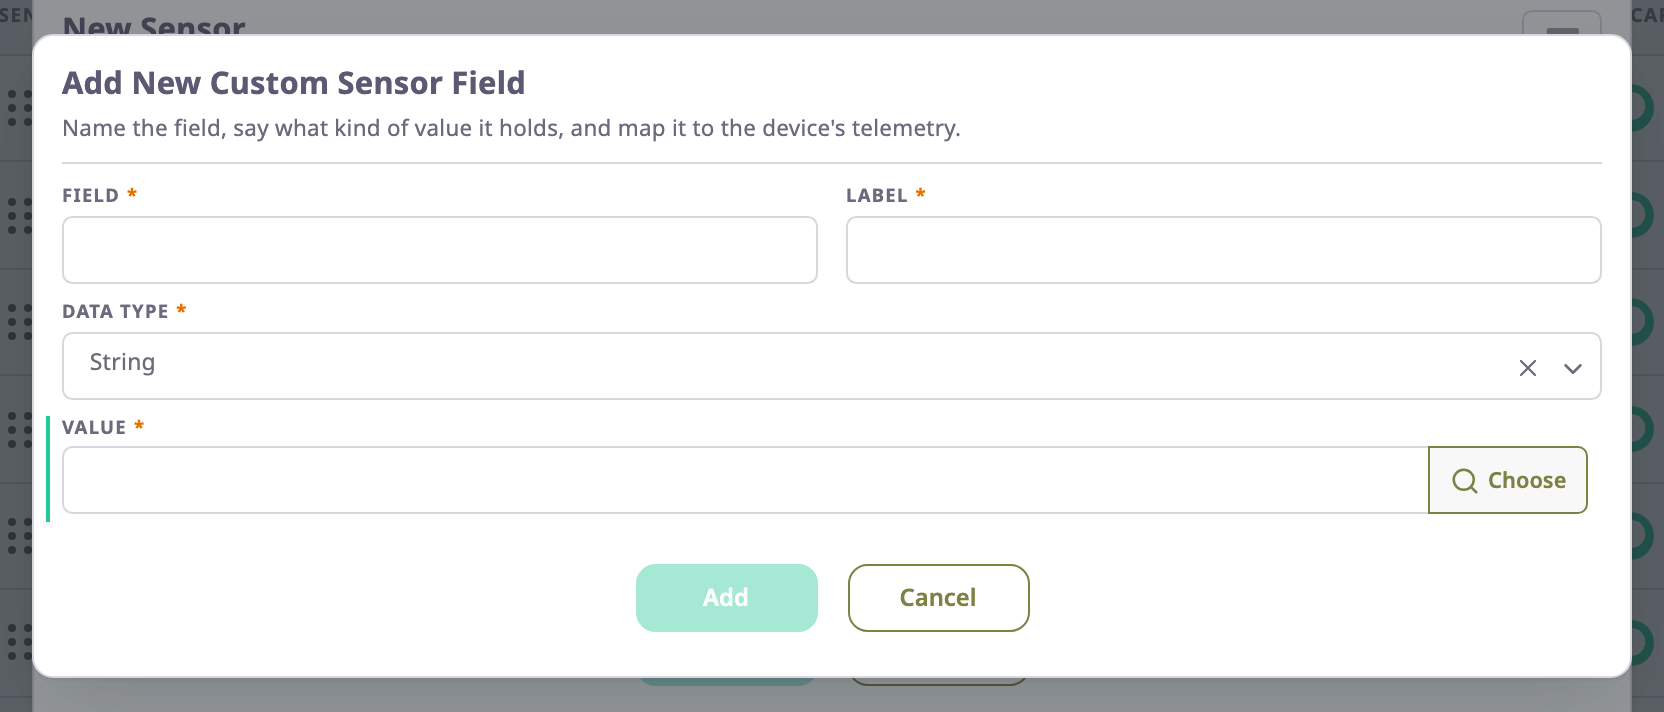
A sensor of type CUSTOM has no fields of its own. You add each one with Add New Custom Sensor Field, under the sensor's fields, which opens a dialog of the same name:
| Field | Required | What it does | Allowed values / example | Notes |
|---|---|---|---|---|
| Field | Yes | The field's key, used in expressions as [Sensor#key]. |
2 to 30 characters: lowercase letters, digits, hyphen and underscore. Example: probe_v | The dialog refuses capitals; its message then adds "and Field should be in lowercase". |
| Label | Yes | The field's name in the dialog and on the unit card. | 2 to 60 characters. Example: Probe voltage | — |
| Data Type | Yes | Whether the field holds a number or text. | Number or String | Only Number fields get a calibration table. |
| Value | Yes | The expression the field computes, with the same Choose button as a telemetry row. | An expression. Example: {adc} |
Appears once you choose a data type. |
Add adds the field to the sensor in the dialog; Cancel discards it. The sensor's Save stores the new field. On a CUSTOM sensor, the bin icon beside a field's Calibration table removes the field and its table.
¶ When you cannot save
While something blocks the save, a line beside Save names the first reason:
| Message | What to do |
|---|---|
| "Pick a sensor type to continue" | Choose a Type. |
| "The sensor needs a name" | Enter a Name. |
| "A telemetry parameter is not valid" | Fix the expression whose check line shows a problem. |
| "A required parameter is still empty" | Fill in every field with an asterisk. |
¶ Changing the type of a saved sensor
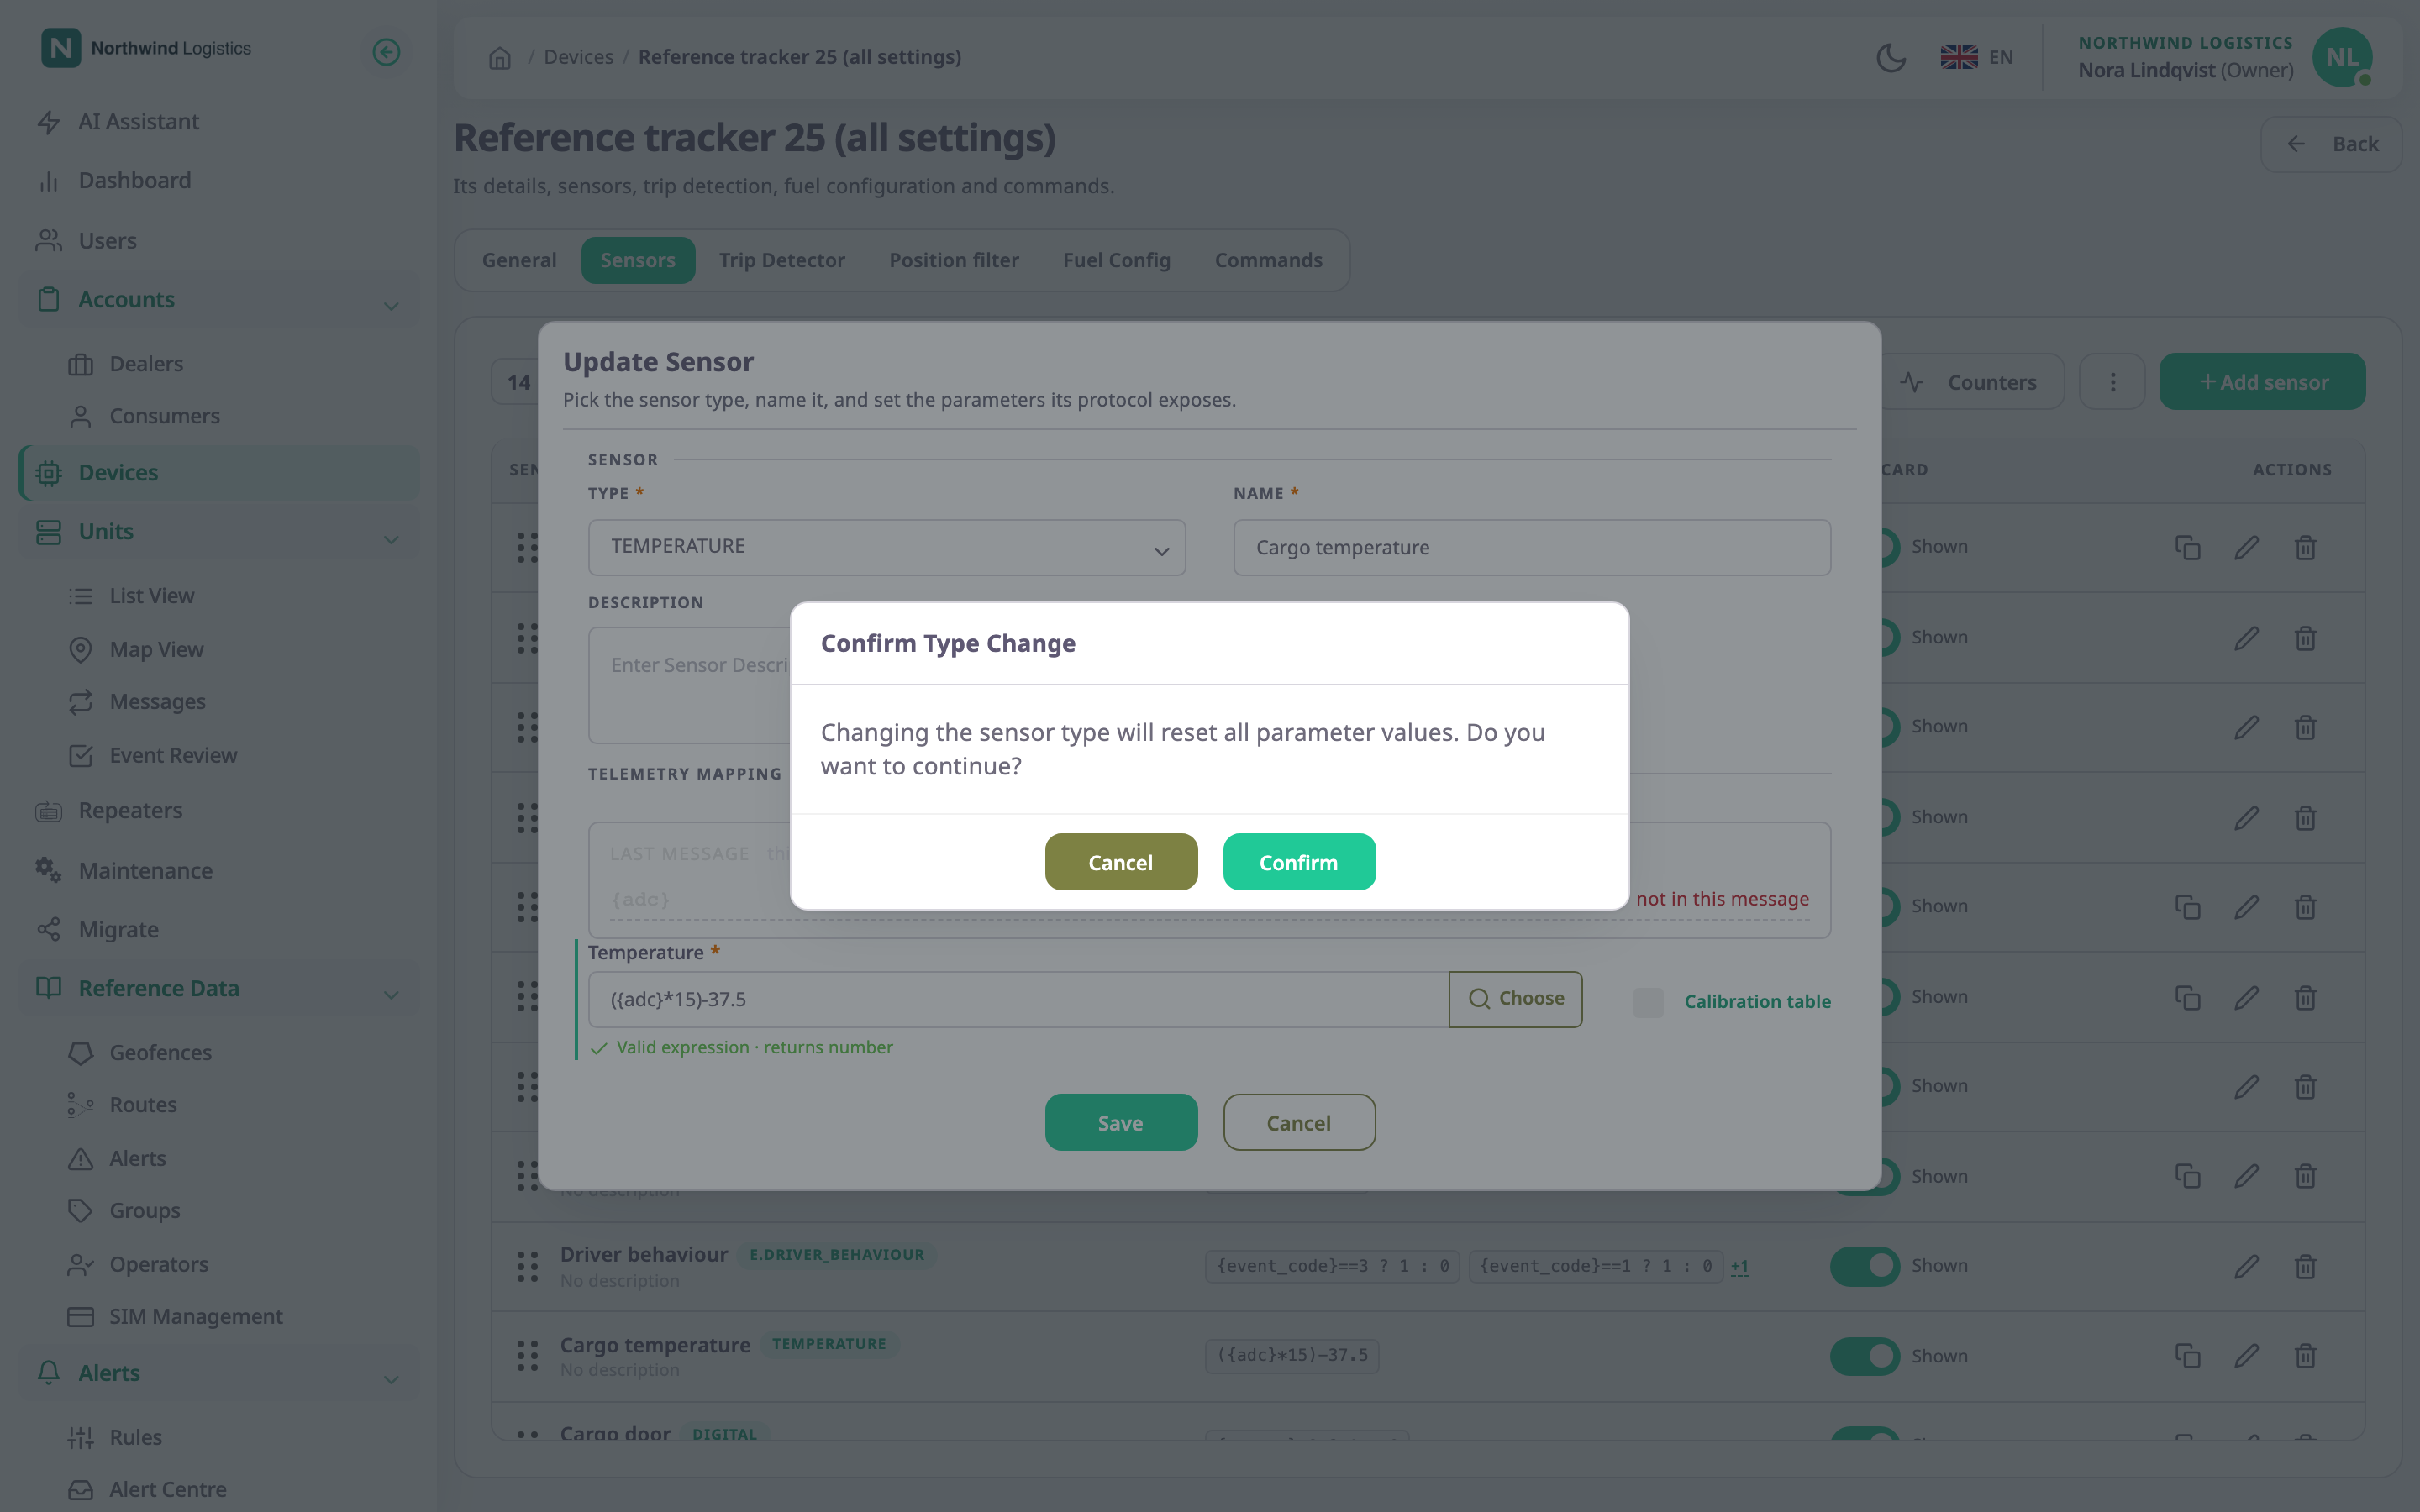
In Update Sensor, choosing another Type opens Confirm Type Change: "Changing the sensor type will reset all parameter values. Do you want to continue?" Confirm switches the type and empties every field. Cancel keeps the old type and its values.
¶ Buttons and messages
| Action | What happens |
|---|---|
| Save | Checks the sensor and saves the device's whole sensor list. The app shows "Sensor added successfully." or "Sensor updated successfully." and closes the dialog. Saving a GPS or FUEL sensor also shows a note that the Trip Detector or Fuel Config tab is available. |
| Cancel | Closes the dialog. In Update Sensor, it restores the values the sensor had when you opened it. |
The server checks the sensor again when you save. If it refuses, the dialog stays open and the app shows why. In Update Sensor, the fields go back to the values the sensor had when you opened it, so make your change again. Typical messages:
| Message | Cause |
|---|---|
| "The temp (unknown protocol parameter: probe_2) filed datatype or value is invalid in Second probe" | An expression names a parameter that the device's protocol does not have. The message names the field, the parameter and the sensor. |
| "Expression must return a number" | The field returns true or false. Wrap it as <expression> ? 1 : 0. |
| "Condition references nothing" | The condition tests only constants. |
| "Calibration table already set" | You added a condition to a field that already has a calibration table. Clear the table first. |
| A message that ends in "sensors loop found with" and a sensor name | Two sensors read each other, directly or through other sensors. The app saves nothing. |
¶ Permissions
- To add, change or delete sensors you need Devices > Edit. The built-in Owner role of a dealer account has it.
- With Devices > Read only, or on a device your account may not edit, the dialog opens as View Sensor.